Contents 

Welcome
What's new in PhotoMix?
About this guide
Installation
System requirements
Installing PhotoMix
Upgrading from previous version
Uninstalling PhotoMix
Create your first scrapbook
Step 1: Add photos
Step 2: Choose composition
Step 3: Add photos to project
Step 4: Increase photo size
Step 5: Scroll photo
Step 6: Select frames in project
Step 7: Apply borders
Step 8: Add and edit text
Step 9: Save project as photo
Output options
Save as photo
Set as wallpaper
Send photo via email
Print
Support
Getting support
Contact support
Register PhotoMix
Why register?
How to register
Order PhotoMix
Reference
About fCoder Group, Inc.
Contacting fCoder Group, Inc.
End User License Agreement
Interface
Main Menu
File
Edit
View
Help
Pane
Main
Photos
Composition
Borders
Backgrounds
Clipart
Layers
Smart toolbars
Common frame
Text
Clipart
Several frames
Page toolbar
Sharpen
Blur
Brightenss/Contrast
Gamma Correction
Grayscale
Blue/Red correction
Page
ToolBar
Supported formats
Keyboard shortcuts

PhotoMix Online Help

Prev Page Next Page
PhotoMix

Step 8: Add and edit text


Previous  1  2  3  4  5  6  7  8  9  Next

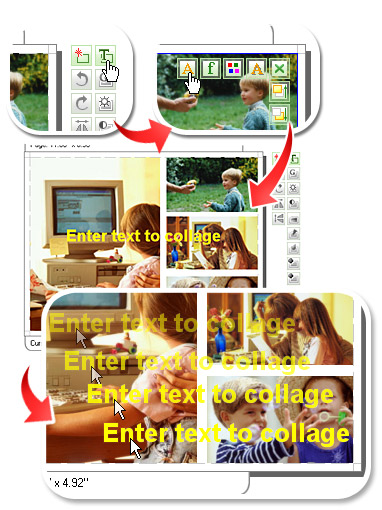
In the toolbar, press button. A frame containing text appears - please select it. In the top right corner of the frame, locate button. Press the button.
Delete the sample text with the help of your keyboard, enter your own text.
Change font - press button. This button is located to the right of button. Select font and font size.
Change text color - press the button located to the right of button.
Move text in the project. To do this, position mouse cursor over the text, press left mouse button and drag the text to the bottom right corner. Release the mouse button.

Related topics

Previous  1  2  3  4  5  6  7  8  9  Next


fCoder Group, Inc. © 2005